
 Precut fabrics getting ready to be sent out.
As august is my month of the Eurovision Quilters, I am posting a recipe for the "bee friends" block.
The block is inspired by Freddy Moran and Gwen Marston's book Collaborative Quilting (Garden party Ladies on page 80).

 The sky strip (3" * 10") is ready to assemble.
 All the seams are ironed open. Next sew the three strips together. Iron the seams open. The top of the block is now finished!

 Next is your third design decision. What angle to make the legs?

 Next step is to take the two 1.25" skin fabrics and sew these 5 pieces together into an strip as straight as possible. Press the seams open. (We will square up this strip later.)


 Sew together your two sky fabric and the skirt as straight as possible. Press the seams open. (We will square this strip up later on. ) If you chose the smart way, your strip will be wide enough.

 Next, on to your fifth design decision: What angle to choose for the hemline of the skirt, where the skirt meets the legs?

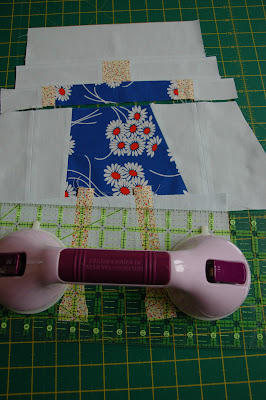

 Almost there! Just straighten up the arm and skirt with your ruler and sew the top part to the bottom part. I folded mine to make sure the wider bottom part was centered to the top. Sew together. Press seams open.

 Time to square up the block. Mine measures 10" * 13". The measures will vary a bit. That's ok! I would like some blocks to be longer, some shorter, and some more narrow, too. Variations make these girls into individuals. You may want to let them resemble your shape: tall, short, slim, wide?
 The last step is to sign the block.
The bee members will all receive precuts from me. If you would like to join us in making this block, please feel free to cut out:
from background fabric ( I used Kona Sky):
3" * 10" (sky strip) , 2" * 10" (head strip) , 1.5" * 5" (arm strip) , 10" * 10" (dress and legs)
from skin fabric: (I used a fabric from "The roaring '20s and Beyond" line by Betsey Telford)
2" * 2" (head) , 1.5" * 5"(arms) , 1.25" * 6" and 1.25" * 6"(two legs)
from dress fabric: (I used Denyse Schmidt's line Katie Jump Rope and Sandi Klop Wee play)
1.5" * 7.5" (arms) , 6.5" * 7.5" (skirt)
These measures include seam allowance of 1/4 inch and allows for a bit of individual customizing of the blocks. Please read through the post before you start sewing.
Here is the picture of the fabric pieces:

We are making the top part first:
 The sky strip (3" * 10") is ready to assemble.
Take the head sky strip (2" * 10") and cut it in two. ( 2" * 5"). Sew the skin fabric to the sky. See picture.
Then we're designing the arm strip. Cut the sky fabric and skin fabric in two and sew them together into 1.5 strip segments.
Then it is time to make your first design decision. How long arms do you want?
I cut my skin fabric into 1" wide. Then I cut my dress fabric down to 7". These three pieces were then sewn together into the arm strip.
 All the seams are ironed open. Next sew the three strips together. Iron the seams open. The top of the block is now finished!
Then it's time to make your second design decision. How tall do you want the dress to be?

Center the dress on top of the sky square along the top edge. Move those legs away and make a straight cut. I decided to make my dress 6" tall and made my cut:
 Next is your third design decision. What angle to make the legs?
 You may choose to make them vertical. That's fine. I made mine angular. Pointing the ruler from the head I found an angle well inside of the skirt width and made two different cuts in the leg strip (4"). See picture below for reference.

 Next step is to take the two 1.25" skin fabrics and sew these 5 pieces together into an strip as straight as possible. Press the seams open. (We will square up this strip later.)
It's time for the fourth design decision. How wide is her dress?
Here you have two options. The smart way or the "easy" way.
The smart way:
Take your sky strip (same height as the skirt) and make a vertical cut it in the middle. Put these two background pieces down with an 2" open space between them. Put your dress on top.
The "easy" way:
Center the skirt fabric on top of the sky fabric.

Find an angle that will start at the armpit and end well outside of her legs. Make the right and left cut with different angles if you wish.

 Sew together your two sky fabric and the skirt as straight as possible. Press the seams open. (We will square this strip up later on. ) If you chose the smart way, your strip will be wide enough.
If you chose the "easy" way, it will involve an extra step. You take the sky piece that was cut out from underneath her skirt. Divide it in the middle with a vertical cut and add to the two sides of the sky strip to make this wide enough. See picture underneath for reference:
 Next, on to your fifth design decision: What angle to choose for the hemline of the skirt, where the skirt meets the legs?
If you go for a straight line. Just straighten up the two edges and sew together.
If you want another angle, like me:

Make sure the leg strip overlaps the skirt strip. Make an angle that is within the double layers. (See picture below.) Cut.


Remove cut offs and sew together these strips. Press the seams open.
 Almost there! Just straighten up the arm and skirt with your ruler and sew the top part to the bottom part. I folded mine to make sure the wider bottom part was centered to the top. Sew together. Press seams open.
 Time to square up the block. Mine measures 10" * 13". The measures will vary a bit. That's ok! I would like some blocks to be longer, some shorter, and some more narrow, too. Variations make these girls into individuals. You may want to let them resemble your shape: tall, short, slim, wide?
 The last step is to sign the block.
 I used a plate and a chalk pen to mark a half-circle between the hands (inspired by the Katie Jump Rope fabric from Denyse Schmidt) Please use a permanent marker and write your name above the head of the girl.
That's it!
Sorry for the long post. Hope it is clear and not too confusing. I did my best!
If you wish, please make a test block before you use the precut fabric I sent out. The test block is great as a reference block for you to keep. (This is just a suggestion, you don't have to if you don't want to.)
I am planning to assemble these "bee friends" blocks into a lap or a wall quilt. The full layout is not decided yet. I do have some ideas, and I plan to post about the progress...
; )
Hope you'll enjoy piecing and individualizing these blocks! Feel free to link to this post. And please send me a picture or a link if you decide try them out. I would love to see different versions...


17 comments:
Congratulations for the work and the blog
Tastefully
Hugs from Brazil
Fernanda Felix
Veldig artig blokk, og kjempefine instruksjonar. Blei inspirert til å prøve når eg kjem heim frå ferie.
Har forresten prøvd noko liknande ut ifrå Lapemakeriet sin logo, men di blokk ser mykje meir spennande ut. Her er mi: http://tiny.cc/sf385
I love them! They should turn out great. I love the way that you made your's different. I made one girl - I think I need to make some more!
A-Dor-A-Ble!!!!! How unique, as well. I especially like the way you are having the blocks signed. Clever.
is an excellent tutorial and such a cute and versatile block. Great job!
This is wonderful - love how you're having everyone sign them! This is going to be a really unique, fabulous quilt!
Great tutorial, thanks Marit.
It must be fun to part of a European bee. I hope you will show all the blocks returned to you!
Excellent tutorial. Thanks for sharing it with us.
Where did you get the sucker on your ruler from? I've been looking for something like that for ages, but the ones they sell for bathrooms are too big.
thanks for the tutorial. i've already made 2 blocks. fun!
I think I told you this on flickr Marit, but these blocks are just adorable! Thank-you for posting the how to!
This is so adorable! I can't wait to see the blocks you get back.
Jennifer :)
I am now on my ninth doll. This is ADDICTING! Thanx for the great tutorial!
Hi
I have sewn a girl block today
It was so fun I must ask some of my friends to participate
Hugs from Sweden
Britt-Inger
I just stumbled upon you blog today. I really love the girls from Freddy $ Gwen's book. I want to give this a try. Your instructions are great.
Just found your blog! Delightful. And I love the doll blocks, thanks for the tutorial!
Linda in OK
http://quiltcookies.blogspot.com
She is adorable!
Very cute, she is jumping rope. I have taken many classes back in the day from Freddy Moran.
I think she is still teaching.
Post a Comment